
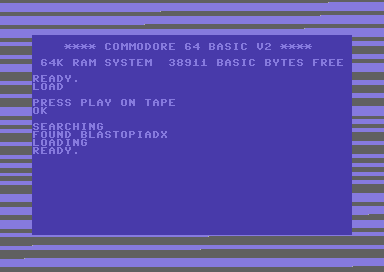
Back in 2018 I wrote my very own multi-load using Martin Piper's turbo tape loader source for Starfysh Remix. I have to admit, it was a real pain in the backside to make, but I achieved my goal there. I also made a decision at the time, while making Cruiser-X 79 to make future multi-load games load from disk only. That was of course until now:
In
early 2021, Zzap 64 was reborn as a Micro Action
magazine by Fusion Books. Each issue Zzap 64 hoped to have an
optional cover mount. It started with disk, but there was a popular
request
for tape version of the cover mount. A majority of games and playable
previews were of course
mostly single files, but recently I was asked about support or advice
for multi-load on tape.
Well, I have a simple solution. We are going to attempt to make our own
multi-load project. Usually I use Martin Piper's ACME and Tape Tool
Build to master my programs
to a digital tape form. However it doesn't add any pauses after loading
each segment, unless IRQTAPE1.a was used. Also the tape loader uses
many zero pages, which may interfere with some game code (unless the
game zeropages have been fully initialised). Instead,
we are going to use PRG2TAP and of course Freeload to generate our very
own multi load tape. Later on in this feature, there are also tips on
how to make a tape master disk out of Freeload. Right, it is time to
get started.
Easy
steps to making a tape multi load (Using Freeload and PRG2TAP)
Before
making your own multi-load tape for your C64 game, you will need the
following:
DASM cross assembler (For assembling the tape
loader system)
FREELOAD MULTI LOAD tape loader source code (available on Paul's site)
PRG2TAP for
generating your mastered tape image (Alternatively you can use
Freesave).
The
original Freeload tape loader, also known as the Ocean Loader was
written by Paul Hughes back in the 1980s. The source code has been put
into the public domain by the creator of this tape loader himself. This means
that you are most welcome to download the source, explore it and modify
the tape loader code to you particular needs, and of course use it to
master your own game creations onto tape.
First of all, if you are familiar with making disk multi-load games. Making a tape multi-load is slightly more challenging. You may need to re-organize your files, and make sure your filenames are uncompressed or you used Exomizer's mem -l $loadaddress cruncher, and have the exomizer decrunch routine in place (if using compression). DO NOT USE THE LOADING DECOMPRESSION ROUTINE – THAT WILL NOT WORK ON TAPE LOADERS.
-
Get your files organized
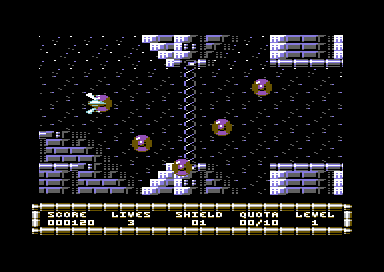
If you are writing a tape multi-loader which files were you trying to load onto disk? I did an experiment on Blastopia DX, in which uses just the in game graphics to be loaded separately. The game graphics files I chose to make separately are as follows:
- Game charset
- Level map data
- Level tile data
2. Setting up your tape loader prompts
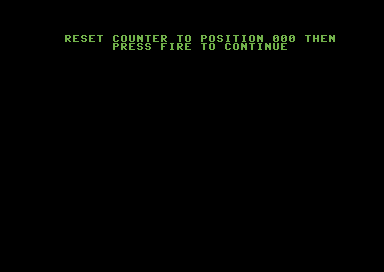
At the start of your main program (when you run it), before the title screen (or whatever) you will want to put a text message on screen. This can be to prompt the user to Flip tape to side 2 and rewind to the beginning, press fire or alternatively Reset tape counter to 000 and press fire to continue. Then run the main program (unless of course the title screen has to load or re-load). For my Blastopia DX experiment, I kept the title screen code and other bits in memory. Just load the game graphics data (uncompressed).
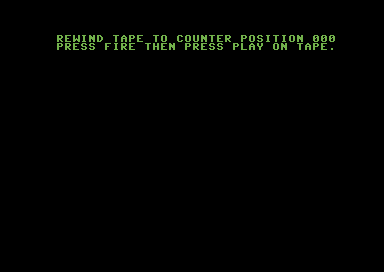
The other prompt you will want to add, when starting a new game would be Rewind Tape to the Start of Side 2 or Rewind tape to position 000, press fire then press PLAY. I added this prompt straight after pressing fire on the title screen, so the user can rewind the tape to the beginning of counter position 000.
3. Setting up the tape loader
Before you can actually import the Freeload multi-load tape loader source into your project. You will need to edit it to where you wish to place the tape loader. You can easily use NOTEPAD or any other text editor to edit the source code. For Blastopia DX, I have chosen to put it at $C400 (Where Exomizer's decrunch source used to be placed). Also make sure you replace the routine after loading finished, INC $D020, JMP *-3 with RTS.JSR INIT_TURBO
LDY #2 ;Total number of files to load before exit loader
JSR INIT_TURBO
Change INC $D020, JMP .-3 into RTS after that command above
It is also important that you set the number of files each level consists of. This is the total number of files that should load before exiting the tape loader and continuing on with the main game. I set LDY #3 before JSR INIT_TURBO as the total number of files I want to load is 3.
You can also alter the appearance of the tape loader, by altering the source if you want to.
The default loader is less than $0200 bytes in size. Which is pretty small. You should be aware to not use $20 as zero page address, since the loader uses it. After you have finished editing the tape loader source, save it. Copy the text file and then paste it to the DASM directory. Then in the command prompt use:
cd\dasm\
dasm freeloadmulti.txt -o freeloadmulti.prg
After you have done this, copy the freeloadmulti.prg to your project folder. Then import it into your project source.
4. Calling the game code to run the tape loader then run the game

When it is time to load your game code. Simply delete the disk loading routines and replace with a simple jsr routine. (Make sure all interrupts are switched off first):
jsr tapeloader
Please take note that the tape loader has to be the address which you have assembled your multi-load tape loader to your built program. For example Blastopia DX tape multil-oad is jsr $c400.
Underneath jsr tapeloader, you will need to restore the $01 value to match your game.
5. Building the source
With the tape loader in place. You should now build your main program source using your cross assembler. Then use Exomizer V3.1.1 to compress the program. For Blastopia DX I used:
exomizer sfx $4000 blastopiadx.prg -o blastopiadx.prg -Di_ram_during=$34 -n
6. Preparing and assembling the main program loader
After finished compressing the program. It is time to make a copy of the tape multi-loader source. We want to turn this into a standalone program loader. Alternatively if you want to display a scroll text, loading music, etc, it is also possible to do that also using my example on Assemble It – Chapter 7. For now, we are just going to make a simple main program loader.
Assuming you already copied the tape loader source file. Rename it to PRGLOADER.txt. For this example, I decided to place the program loader at $E000.
(Changed from .ORG $C000, to $E000)
Now the total number of files I want to load from tape before running the PRG is only one. Change this to:
JSR INIT_TURBO
LDY #1 ;Total number of files to load before exit loader
JSR INIT_TURBO
then instead of INC $D020, JMP .-3 (or RTS) change this to
LDA #$1B
STA $D011
JMP $080D ;Run Exomizer sfx decruncher before execute game
Use DASM to assemble the source prgloader.txt
DASM prgloader.txt -oprgloader.prg
7. Putting it all together using PRGTAP

Now we are ready to prepare and build our tape image for our production. Before this can be done. You will need a FREELOAD header and boot file to accompany this task. Good news is that I have prepared an example file for you to download and build already. Simply rename BUILD.txt to BUILD.BAT and click on the batch folder. You are also welcome to use the boot and header file.
Before you can use PRG2TAP to build your freeload multi-load file. You will need to create a batch file that executes the path of PRG2TAP and of course your project. (As I have mentioned in the paragraph above, I have kindly supplied an example accompanying Blastopia DX, all you need is PRG2TAP and DASM).
Your batch file should be something like this:
-prg2tap -h “freeload” -n “mygame” -p “bootturbo.prg” “header.prg” test.tap
-prg2tap -a -f -s “BIN\BLASTOPIADX.prg” test.tap
-prg2tap -a -f -s “BIN\LEVEL1CHARSET.prg” test.tap
-prg2tap -a -f -s “BIN\LEVEL1MAPDATA.prg” test.tap
-prg2tap -a -f -s “BIN\LEVEL1TILEDATA.prg” test.tap
…..... and so on.
After you have clicked on the batch file that contains the boot turbo, tape header, the main program and your level files. Copy the PRG2TAP executable into the tape mastering directory. Also Ensure the path and filenames are correct. Then run the batch file to generate your tape. Once the tape is done, test it to make sure it all works. If it has.
Congratulations, your tape master has worked brilliantly :)
Splitting Tape Sides
Let us say you have written a game in which the main program loads on one side of the tape. Then load level data on the other side of the tape. It is also possible to make 2 separate TAP files using PRG2TAP. Here's how it can be done:
-prg2tap -h "freeload" -n "mygame" -p "bootturbo.prg" "header.prg" test_side1.tap
-prg2tap -a -f -s "BIN\BLASTOPIADX.prg" test_side1.tap
-prg2tap -a -f -s "BIN\LEVEL1CHARSET.prg" test_side2.tap
-prg2tap -a -f -s “BIN\LEVEL1MAPDATA.prg” test_side2.tap
-prg2tap -a -f -s “BIN\LEVEL1TILEDATA.prg” test_side2.tap
…..... and so on.
A bonus tip
In many of Ocean's C64 games, this tape loader was used, but it also gives the gamers a chance to skip to the next level if the game is over, instead of rewinding the tape they load the next lot of data, and the game runs from there. That is a very strange thing, but it is possible to put a stop to those sort of antics. How can that be done? A checksum routine should be created, which loads an additional file and after loading the last file, if the checksum matches, then run the level of your game. If it doesn't then perhaps create a routine to force the player to rewind the tape to the start of the position and press play, or maybe punish the user to make a fake tape loading error crash. The idea is up to you.
Making an actual C64 based tape master disk

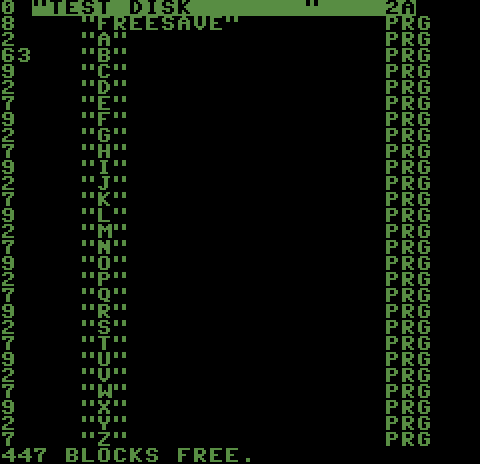
Using Paul's "Freesave" tape mastering source code. It is possible to make a tape master from disk, and write it to tape. You will need to set the filenames, amount and also the addresses to save from and save to. The source code for making a C64 based tape master is available from Paul Hughes' Freeload web site. (Freesave)
Before doing this you will need import all of the files onto your D64 and rename the files A-Z (or whichever your files end as).
For example with Blastopia DX (Supplied in the download):
A - Program loader : $E000-$E200
B - Blastopia DX: $0801-$4600
C - Level 1 Charset: $0800-$1000
D - Level 1 Map: $1800-$1940
E - Level 1 Tile data: $A000-$A640
F - Level 2 Charset: $0800-$1000
G - Level 2 Map: $1800-$1940
H - Level 2 Tile data: $A000-$A640
I - Level 3 Charset: $0800-$1000
J - Level 3 Map: $1800-$1940
K - Level 3 Tile data: $A000-$A640
L - Level 4 Charset: $0800-$1000
M - Level 4 Map: $1800-$1940
N - Level 4Tile data: $A000-$A640
O - Level 5 Charset: $0800-$1000
P - Level 5 Map: $1800-$1940
Q - Level 5 Tile data: $A000-$A640
R - Level 6 Charset: $0800-$1000
S - Level 6 Map: $1800-$1940
T - Level 6 Tile data: $A000-$A640
U - Level 7 Charset: $0800-$1000
V - Level 7 Map: $1800-$1940
W - Level 7 Tile data: $A000-$A640
X - Level 8 Charset: $0800-$1000
Y - Level 8 Map: $1800-$1940
Z - Level 8 Tile data: $A000-$A640
Edit the freesave.txt source code to allow the tape master to load your chosen files on disk (in order or letters). Set the total number of files to master before the tape master has finished and also edit the filename list so that it is reverse-order of the filename letters. Take note that the filename read routine reads the files in reverse. Filename A is always read as the first filename, but the file string has to be ZYX.... all the way to A. Make sure to set the loader start jump address to the load address you have assembled your tape loader to run at before loading and running the main program.
Once you are done, and you have edited the tape load filename and other text. Use DASM to assemble your freesave.txt source, and then copy it into your D64. Now the files should look something like this:
Load in FREESAVE and then type in SYS49152. You will then be ready to master your tape on a real C64 with datasette (or Ultimate 64). It is highly recommended that you do not master your tape images using VICE, or CCS64 as there is likely to be no pause between each file after loading.
And there you go, a complete tape master.
That wraps up this feature. I hope you have found it interesting and hopefully easy to understand.