
Last updated: 23rd July 2009
Special thanks to Rio / Rattenrudel for updating this page.
Downloads of DMC added by Richard Bayliss
Before you check out this article.
DOWNLOAD DMC Music Editors
(Pack contains DMC V2.1 (GRAFFITY), DMC V4.0 (GRAFFITY) + Docs (By Richard), DMC V5.0, DMC V5.0+ (CREAMD/C64.SK), DMC V5 PACKER, DMC V5.0 SCANNER and DMC V7.0 (GRAFFITY+UNREAL)
1 Introduction
1.1 Preface
Richard's Preamble:
Welcome to the 'Music Scene' tutorials. All the resources are my and rio's work - preversions are appeared in Commodore Scene. We start from the BASICS to the advanced music composing using my favourite music composer, which is Graffitys' Demo Music Creator V4.0. So please select a category from below and let's get started in the tutorial.
Rio's Preamble:
Regarding to Richard's welcome, i want say hello too. Inspired by Richard's DMC tutorial and my own experience using that editor, i was motivated enough to update and to overwork the article completly (with detailed chapters and some artwork too). I added a table of content and as well as further infos and knowledge about using SID and DMC 4 and 7 (that's my fav editor). Some chapters are united by richard's and my work, so that people, which want to start composing in these days have a compact documentation about one of the best editors for Commodore 64.
Why we do this?
Because we have fun to make music on a C64, sharing some knowledge about Editors which are use the unique SID synthesizer for composing tunes.
What you need for using DMC?
You can start with a real Commodore 64 with 6581 or 8580 SID in it (you will need some storing hardware too, like floppies etc.) or an emulator like VICE or something else, which can manage disk commands and sid emulation etc. Notice that there is a difference between the SID types. More details will be given in the chapters below. Notice as well, if you use an emulator, there will be another key assignment. Please read about that by yourself. The whole tutorial will be referenced to original C64 keyboard assignment.
Further you should know something about bits and bytes. A understanding for hexadecimal number system will be necessary. But for those, who don't know: It's a number system with a cardinal number of 16 (0,1,2,3,4,5,6,7,8,9,A,B,C,D,E,F). So every parameter or counter have to write down as a hexadecimal number. Parameter or command in this documentation will be described with variables, like:
SND.xx
or
FX: xy
or
FX: xy
If there are two x variables - a 8 Bit parameter will be expected. If i talk about x and y variable, then two 4 Bits (nibbles) parameter will be expected. In some cases x and y represent a state of a flag for each parameter (e.g. FX, Waveforms). Then every bit of a byte (8 Bits) can be set for a specific state. For example, if we want to change Bit 0 (it's first position), we write a 01 as hexadecimal number. If we want to change Bit 1 and Bit 2 we write down a 06, because 0110 (bin) is representing a 6 in hexadecimal system.
If you have some special comments or annotations, we are pleased if you add your queries in TND forum.
1.2 DMC Versions
The predecessor of DMC is the GMC - Game Music Creator, written by Brian of Graffity too. You will find some similar elements in that editor too, but the following DMC versions are more improved. The way of DMC development (2,4,5,6,7) was accompanied by several groups and is at least mainly splitted in two programs: DMC 4 and 5. Some groups have done modifications in both DMC version, so you will find a mass of different releases. Most of them should never be spreaded. DMC 7 (by unreal) was using the code of DMC 4 and it's fitted out with some special functions. So the first tutorial part is fold up for both versions.
2 Getting Started with DMC 4 or 7
So many people in the C64 scene uses DMC 4 and we are two of them. Well, if you were expecting the old Music Scene by Andrew, think again. This is because Richard have decided to take over 'Music Scene' and now i (rio) have updated the whole tutorial at last (Richard hopes Andrew didn't mind this at all).
We have decided to teach you all how to turn yourselves into cool C64 music composers. For those of you who are interested in learning to use DMC 4, we'll be teaching you how to compose, using sid fx's and dmc commands. You will get an amount of knowledge about synthesizer and of course using Commodore 64 SID chip for your own style of music. Anyway, let's forget all this nitty gritty and get on with some serious experimenting.
The DMC 4 and 7 player has various options and editors, which can help you create your own demo songs by using the 3 Channels of SID. You can even use up to 8 different tunes in one file, by using tune switching. Furthermore DMC 4 / 7 allows you to monitor playing notes in 'LIVE PLAY SYNTHESIZER' Mode (listen to notes, by touching keys) and to record sequencies in a time-dependent 'RECORD MODE'. Direct Monitoring (VOICE ON/OFF) allows you to listen everything you tap in. DMC 7 is fitted up with a trace play mode.
If you start the editor, it looks something like this:
|
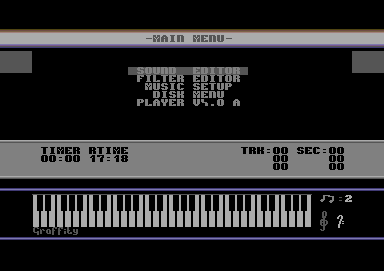
2.1 Main Menu
The DMC has various menu options involved. There are sound and filter editors, a music setup, a disk menu (or I/O menu) and different player setups. By pushing ← (DMC 4) or CTRL (DMC 7) you will get into the main menu. Use the CRSR keys to highlight an option, use RETURN to choose one.
The Sound Editor is for creating your instrument set. The filter editor is for editing filters, which can be assigned to a special instrument from Sound Editor.
In music setup (tune setup) the global speed and global volume can be defined.
Activating the disk menu or I/O menu will switch into file operating menu, where you can load and store your tunes or to use some DOS commands.
In most DMC versions are different player routines integrated. You are able to choose a player (e.g. A or B). Some are better in quality, others have a better raster timing.
|
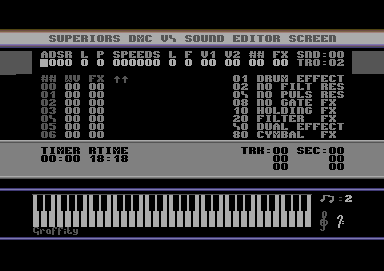
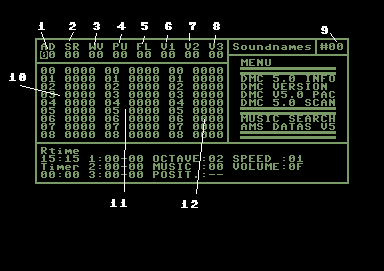
2.2 Sound Editor
First of all, you need to build the instruments yourself. Highlight the 'Sound Editor'
option in main menu.Okay, now take a look at the image below. It shows you what the Sound Editor looks like. If we go the first time in the Sound Editor the first instrument will be choosen automatically. Watch out after SND: xx parameter at the right-upper corner. xx shows the current selected instrument number. Up to 23 instruments are possible (16h), which we can select with + / - keys. You are also be able to copy and paste instruments by pushing: ↑ Arrow (Copy - part of the screen flicker in green) and @ (Paste - part of the screen flicker in red).
The TRO: 0x value below, represents the transpose of a playing test note (C-x) by pushing space. The tone transpose can be selected with SHIFT_R and + / -.
As you can see, the sound data are full of zeroes, therefore there is no sound. Press space to test the sounds. As you can see, you cannot hear the sounds at all, due to no data.
|
If you want to change a parameter, you can select it by using CRSR keys Left and Right. To set up a parameter, simple press a key (0..F). Possible properties for an instrument in the Sound Editor are as follows:
2.2.1 ADSR
The ADSR envelope defines the course of a sound. Now we have the possibility to
adjust the sound for specific forms, instead of a continuous signal. The sound will
also be dependent from playing or holding keys/notes. ADSR stands for:
|
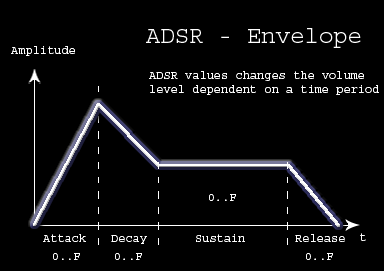
(A)ttack, (D)ecay, (S)ustain and (R)elease
Attack: Time between a pushed note and maximum volume level
Decay: Time between maximum volume level and sustain volume level
Sustain: sustain volume level for a pushed note after Attack and Decay
Release: Time between a released note and minimum volume level (0)
Attack: Time between a pushed note and maximum volume level
Decay: Time between maximum volume level and sustain volume level
Sustain: sustain volume level for a pushed note after Attack and Decay
Release: Time between a released note and minimum volume level (0)
We can use short Attack and Release Settings e.g. for Drums, Percussion or short tones, without using Sustain values. if the Sustain value = 0, there will no further sound played by holding a key. If we set up Sustain and Release values instead Attack and Decay, the sound will be played so long we hold a key and will be fade out by releasing a key.
Every parameter can store a 4 bit value, between 0..F. The higher a value, the higher a part will be influenced the sound. We will write for our first instrument AD: xy and SR: xy as follow:
ADSR: 00EA
2.2.2 Wavetable
By pushing SHIFT_R + RETURN, you will switch in the Wavetable below (##, WV, FX).
The first column shows the wavetable position. The second column have to be filled up with Waveforms
or Commands (like Reset, Loop etc.). Accessory parameters will be written in the last column.
|
|
|
|
|
|
|


The small examples above shows some possibilities, how you can fill up your wavetable. You can try to add these values simple by writing the numbers in it at shown position, and you can test it by pushing SPACE key.
Every 8 bit parameter in the wavetable contains informations about the different Waveform-, Ringmodulation-, Sync-, KEY-Bit for every channel:
|

The Low Nibble (4 bits right) represent following parameter:
Bit 0: Key-Bit (or TEST-Bit - activating ADSR of OSC)
Bit 1: Sync-Bit (syncronizing fundamental frequency of 2 OSCs (Channels))
Bit 2: Ring-Bit (activating Ringmodulation only for Triangle-OSC using in combination of 2 OSCs)
Bit 3: GATE-Bit (activating GATE or not)
The High Nibble (4 bits left) represent the waveform type:
Bit 4: Triangle-Bit (activating ADSR for OSC)
Bit 5: Saw-Bit (activating ADSR for OSC)
Bit 6: Pulse-Bit (activating ADSR for OSC)
Bit 7: Noise-Bit (activating ADSR for OSC)
So following Waveforms are possible:
|
|
|
|


You are able to combine Triangle, Saw and Pulse waveforms:
3x: Triangle + Saw
5x: Triangle + Pulse
6x: Saw + Pulse
7x: Triangle + Saw + Pulse
Notice that the last combinations sounds nasaly (thinner) to a 6581 SID.
While testing the examples above you will notice that Pulse sounds (41 - which activates Bit 0 and Bit 6) will not be heard (if you press SPACE), that's why we havn't defined a Pulsewidth yet. See chapter below.
The only Waveform which can't combined is Noise, because higher values than 8F will setup you jump position: 9x (Ax,Bx ...) and x represents the count of the steps back. Ax will loop x + 16 steps, Bx will loop x + 2*16 steps further and so on, so that you are able to jump in a huge range using other wavetable startpoints too.
Wavetable start points can be set for an instrument by writing a value under ## on the right side on screen (You have to leave the wavetable first).
Notice if there is empty space in wavetable, empty instrument in front of another will not stored if you save a song! Remember this and don't confuse a hexadezimal parameter with a decimal number.
For our first instrument we will set the start point at ## 00 and create a Pulse Loop:
|
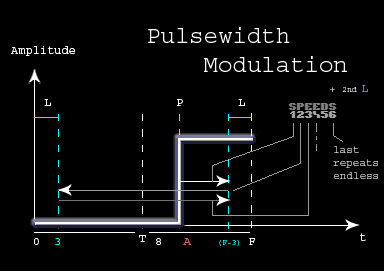
2.2.3 Pulse / PWM
Not hearing a sound doesn't mean there isn't any playing. You will see, that we have
only to adjust the Pulsewidth of that pulse sound, because a pulse wave at '0' will not
change amplitude. So first we setup P parameter. P will setup the pulsewidth between
0..F. Value 0 means low, 8 is middle and F is highest. First we start with P = 8. Then we change
to P = 1. Do you hear the difference? Play around a bit with this values.
|

|

You can add numbers for the six SPEEDS parameter "000000" (1..F). The SPEEDS parameter will pass through in a chronical order. You should always start with the first. That first speed value will run to the right border (max pulsewidth) in a defined speed:
|

A next value will run in the other direction back until the left border (min pulsewidth) is reached. Further values will repeat the both directions again. If a value is defined as 0, it will stop on the last border. Higher speed values gives the Pulse tone more fat sound and more vibration, because the speedtable runs faster.
The L parameter in front of P will define the borders of min and max pulsewidth for modulation. Higher values will cut down the area to swing. Higher values will produce a nice vibro effect. If L = 7 it will not change the pulsewidth anymore.
So let try this little example for comprehension:
|

If a pulsewidth will setup behind these borders and runs away from them, the pulsewidth will repeat one direction 16 times. I'm not sure if it is the intention. Same happends, if L is higher than 8. It will change to another effect.
The second L parameter behind this 6-STEP-SPEED represents the speed fine tuning of a PWM. A entered value will start the PWM in very small speed changes (it isn't necessary to setup 6-STEP-SPEED values before). It will run the PWM in both directions automatically. The fine-speed can be controlled between values of 0..F. The fine-speed value will be added up to the values of 6-STEP-SPEED PWM.
For the whole understanding, please take a look at the following graph:
|
2.2.4 Filter
If you want use filters, you have to define which filterset should be used. First you have
to create an own filterset in the Filter editor (take a look later at this chapter).
The number of filterset should be written down below F parameter.
To activate the filter - take a look into FX Chapter.
2.2.5 Vibrato
Vibrato can be controlled by V1 and V2 parameter. For V1 xy values, x represent
the pause before the vibro should start. y sets the value of range, in which the
pitch should swing around. V2 xx can be used for modulation with V1 y parameter.
V2 allows a higher range.
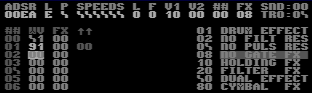
2.2.6 FX
FX is a 8 bit value to control several flag:The Low Nibble (4 bits right) represent following parameter:
Bit 0: DRUM EFFECT (pitch will be ignored in sector editor, in WT: pitch values will step in higher range)
Bit 1: NO FILT RES (for every played note filter will not be resetted anymore)
Bit 2: NO PULS RES (for every played note pulse will not be resetted anymore)
Bit 3: NO GATE FX (holds your note down, until a GATE is set)
The High Nibble (4 bits left) represent the waveform type:
Bit 4: HOLDING FX (Note will not be released)
Bit 5: FILTER FX (activates FILTER, which is defined by F)
Bit 6: DUAL EFFECT (playes Wavetable at half speed)
Bit 7: CYMBAL FX (adds short noise in front of a sound)
The variations of x values (Low Nibble) or y values (High Nibble) can be combined for mixed use. So a 2A will activate Bit 5 (activating filter) and Bit 1 + Bit 3 (no filter reset + no gate), because 2 is the high nibble and gets a binary value of 0010 and A is the low nibble and gets a binary value of 1010. ok?
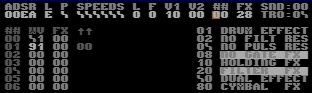
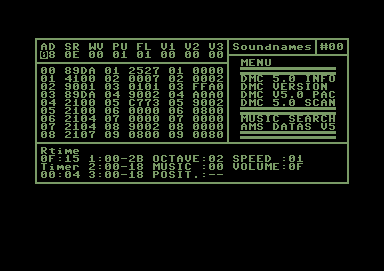
2.3 Filter Editor
We change back to main menu and go into the Filter Editor. In that view, we can't
copy and paste, but it's still possible to store different filtersetups. You can
switch between the different settings with + and - keys.Before we start to create an own Filter, first we need to adjust an instrument in Sound Editor. You have to choose a filterset number (F) between 0..F and then we activate the filter (FX: 20) for that instrument. Then we go in Filter Editor again and we choose the same number of F for (FLT) and define following parameters:
|

Test it by pushing the space key. It should sound very filtered. If you use a 6581 SID Chip (you will find them mostly in a breadbox, not that flat case) you should try instead for number (##) 5 a higher values.
Notice that all these setting are different for using both SID Types (6581 /8580). You have to choose higher values on the 6581, otherwise the filtered instruments sound to deep. Pay attention if you work with a 6581, that you have to set filtered sounds only in one channel! If you use that 8580 chips then a simultaneous use of filtered sounds in all three channels is possible. Composing a tune for 6581 or a compatible tune for both types should only be filtered in one channel at same time.
2.3.1 Parameters
Ok, now is time to clear up the meaning of parameters. From left to right:R: Resonance / Rate
T: Filter Type
Bit 0: Low Pass
Bit 1: Band Pass
Bit 2: High Pass
## CutOff Frequency (frequency, where filter are take effect)
RT: Repeat Step-Position (01..05)
ST: Stop at a defined frequency step, if that step is reached
S1 X1: S (frequency steps up/down) and X (duration)
...
S6 X6
Rate / Resonance defines how much effect a filter will take effect (F is max). The SID allows you to set up and to combine 3 different filter types: Low-, Band- and High-Pass. In our quick example we only used Low Pass, but you can combine Low- and Band-Pass by writing a 3 instead 1 too (e.g. 7 will activate all 3 filter types). The next value below ## represents the CutOff Frequency. If you havn't write a number there, you won't hear anything.
2.3.2 Filter Envelope
If you want to use filter envelops or create LFOs, then the next parameters
can be configured in different ways. The first two params (RT and ST) are only
useful if there is filled up the 6-table (Sx Xy).An example:
|

The Sx Xy parameter will pass through in a chronical order. You should always start with the first (S1 X1). That example runs through that filter envelope in a form of a LFO. For understanding, you have to notice that Sx always represents the frequencies, which will steps up or down. Here, it will first steps up and then steps down at the end of envelope (S6 X6). Then it will start again with S1 X1.
The direction and the amount of steps for a position will be defined in Sx:
00: nothing
01-7F: up (slow..fast)
80: mid
FF-81: down (slow..fast)
Xy defines the duration of that position. After that the next position will be processed. You can see in example above, that the values of steps are facing each other (01<->FF). For a Triangle LFO, we should use the same duration and same step amount for going up and down. So 01 will increase with 1 step and FF will decrease in 1 step too.
|

The example above shows a LFO with a longer pause between gliding up or down. Xy adjust the duration of a step-position (S1,S2...).
That example below will run in more weighten steps. Insteed of 1 step it will raise and sink with 2 steps.
|

We are able to influence the repeats of a LFO too. That example will pitch up:
|

We can influence the length of an envelope too. That following example will stop the envelope, if the step value reached 1D (ST). Notice that the cutoff value have to reach that hex number, otherwise it will be ignored. 1D will be reached, because we always steps 3 values up and then 2 down:
|

In that last example below the envelope will be repeated to S3 X3 after every pass. Higher values than RT = 06 shouldn't be used. Seems it will not have any functionality or will set a wrong state.
|

Please notice, if an overflow occurs, all counter routines of a byte will start again at 00. If we decrement a byte value e.g. at position 00, the next value will be FF. If we increment FF, next value will set to 00.
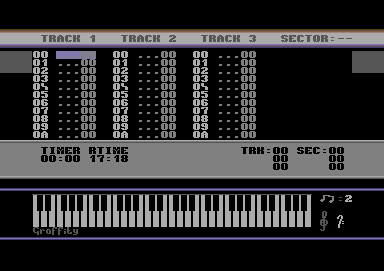
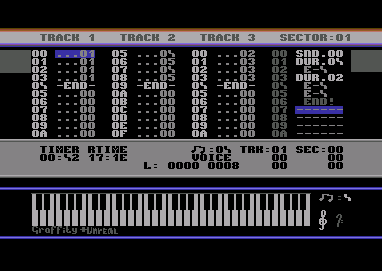
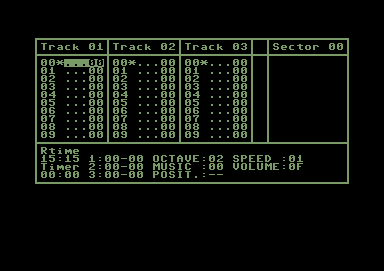
2.4 Track Editor
The Track Editor will be shown if we leave the main menu or all submenus by pressing
RETURN. That Editor handles the arrangement for sectors and shows all your defined
sectors in a sequential order for every channel seperatly. If you start it the first time,
everywhere will be placed a 00 value. SID is concepted with 3 Channels, so there are 3 Tracks
available.
2.4.1 Channels
Every Track contains an index number (postion) and a sector number, which can be
filled up with a special sector (they will store the playing sequence).
Additional we are able to set special commands, like setting a
global transposing value, contolling the end or controlling repeats of a track.The duration of a played sector is dependent of the sector length. So every channel can be played in an asynchronous duration too! If we start composing, we should learn to define synchronous routines. More information about that are described in chapter: Sector Editor.
2.4.2 Options
If we want to play our tune, we can start it by pushing F1. If nothing is defined before
we won't hear anything. F3 will stop and F5 will continues the playroutine.
F7 winds forward a played music. In DMC7 your are able to trace the complete
routine to have a better overview of played sectors in every channel. Simply
press ←. If you want use different player types, you are able to choose between:
NORMAL Player (C= + 1), DOUBLE Player (C= + 2), TRIPLE Player (C= + 3),
, QUADRO Player (C= + 4) and QUINTUPLE Player (C= + 5). Notice that the play routine
will be set to $1006 instead $1003 in higher modes as NORMAL.If we want to test how your instruments sound, by playing in realtime, you can switch into the "SYNTHESIZER MODE" by pushing F8. If we stay in that mode, we are able to change instruments with + and - and to set a transpose value between 0 and 7. F6 will activate the record mode. The recorded sequence can later be placed in any sector in DMC7 (Notice that DMC4 will record in current sector!). If you paste a recorded sequence, notice that you have to place an additonal END! command in your sectors. SYNTHESIZER and RECORD MODE can be turned off by pushing RUN/STOP.
By pushing SHIFT + C we can copy a complete track to another track position (1,2,3). SHIFT + X will exchange a track with another one. HOME steps to the first line and CLR (SHIFT + HOME) clears a track. There is also a COPY / PASTE functionality integrated. ↑ Arrow (Copy - part of the screen flicker in green) and @ (Paste - part of the screen flicker in red). Tracks will be copied only to a -END- Command in Tracks (Everything behind that will be ignored).
DEL deletes, INST (SHIFT + DEL) inserts a line.
A complete tune can be initialise by pressing SHIFT + I. The keys SHIFT + T will switch into the tune menu. Here we can choose which tune should be edited (DMC 4 / 7 can store up to 8 tunes). At least with SHIFT + RETURN we can edit a selected sector. If we step to a 00, Sector 00 will be edited. If we write another number on that position, then Sector xx will change to that.
2.4.3 Commands
At least there are 3 Commands to control the tracks:TR+ or TR- Global transpose up or down for that track
-END- Jump playroutine to X position
STOP! Stop playroutine
Relative transpose settings can by change by + or - keys with a value in front of following sectors. The playroutine will registered that command and jumps to the next position.
-END- Command will set a jump mark in track (SHIFT + E). The playroutine will jump to a specific position (have to be written below -END-) and repeats the whole track area again. Sadly, that functionality was forgotten in DMC7. It jumps only back to the first line.
STOP! Command stops a current playing track (C= + E). No jumps or repeats are possible.
|
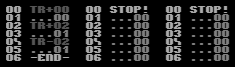
That example above will play only the first channel. The 2nd and 3th are stop by STOP! Command. The first channel uses Sector 00 and Sector 01 (2 times, but in different tone pitch, because a TR Command is used in front of that sectors. The -END- Command loops to the first line back. There is a TR+00 needed to reset the standard transpose. But before you can test this example you have to read that following chapter about sector editing.
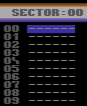
2.5 Sector Editor
If we stay on a number in track, then we are able to switch in a specific sector
by pushing SHIFT + RETURN. For example, the first position of track1
contains a 00. Then we will get into the Sector 00 on the right side. First
we will see an empty sector:
|
2.5.1 Options
We can step with CRSR Keys up and down in Sector Editor. HOME Key jumps to first line
of sector. SHIFT + [ or SHIFT + ] will change the current sector
to previous or next sectors.If you want composing something, first you need to set up Commands like Duration and Sound. Then you are able to write down notes into the sectors. Otherwise it will use the last settings of a sector before. (------) represents an empty step. If you want to change all notes to another pitch value from current position, then you should push SHIFT + < or SHIFT + >. All Instruments below will now transpose up or transpose down.
+ key will switch VOICE ON or OFF, so that you can listen or not to your placed noted. - key will set an empty step (------). DEL key deletes a line, INST will insert an empty line instead. CLR (SHIFT + HOME) will delete the whole sector.
Like in Track Editor - a COPY / PASTE functionality is integrated in sectors too. ↑ Arrow (Copy - part of the screen flicker in green) and @ (Paste - part of the screen flicker in red). Sectors will be copied only to an END! Command in Tracks (Everything behind that will be ignored).
In DMC7 you are able to trace a sector by pushing ←. But beware, i notice some crashes if we do it to often, looks like a bug. SHIFT + RETURN will close the sector editing.
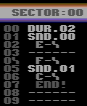
2.5.2 Commands
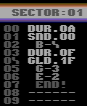
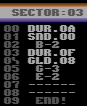
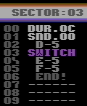
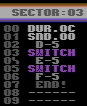
The sector editor allows us to use different commands:DUR.xx Sets the duration for passing one step (C= + D)
SND.xx Sets an instrument number (C= + S)
GLD.xy Slides/glides between two notes (C= + G)
VOL.0x Sets a volume (works if no Attack or Decay is set) (C= + V)
SWITCH Played notes in that section will not be resetted by ADSR (C= + X)
-GATE- Set gate for a played note (£ key)
END! End of Sector will switch into the next sector of track (= key)
|
If you are writing your first tune, you can try to change the duration time (DUR.xx) before the next note is playing. DUR is a command like SND etc., which will be noticed by playroutine - but only interpreted as a command (not as a step!). By setting DUR Command it will jump to next note after waiting of xx Steps. The DUR value represents the duration between 2 note-steps.
Let's take a look to following example:
00 ------
01 DUR.03
02 D-3
03 D-4
04 END!
It will do the same like this:
00 ------
01 DUR.01
02 D-3
03 ------
04 ------
05 D-4
06 ------
07 ------
08 END!
Ok? But the first method has got a better rastertiming and is more space efficient. So you can optimized your composed code with using DUR.
Using GLD.xy command isn't so simple, but here a quick example in two ways:
1. Slide from current note:
We are able to slide from a current playing note to another note. We have to adjust the GLD.xy parameters with x=1 and y=speed (0 - none, 1 - slowest, F - fastest) and we need to set the destination note. You can try to play these sectors (01, 02) in a loop:
|
|

You will hear a downslide to G-3 (from B-4) and an upslide to G-3 (from B-2) in the second sector, but both in different amount of speed and you have also to watch out how many steps are between the notes. If you slow down the speed of slide in the first sector (instead F e.g. y = 3), you will notice that the duration of slide will be execute too long and next notes will be involved. Then the next note will slide, which actually shouldn't be slided.
2. Glide between two notes:
The second way is to glide between two fixed notes. We need to set the source and destination note after GLD.xy Command. We have to adjust the GLD.xy parameters with x=0 and y=speed (0 - none, 1 - slowest, F - fastest). We have also pay attention to duration and speed of glide. If any next note will be played and the glide isn't finished, it will influence the following notes too! The both notes, which are followed after that GLD Command will be interpreted together as one step. The following example will demonstrate a glide between G-3 and E-5:
|
Volume Command VOL.0x can be used to control volume in channel independent from instrument's Sustain level. The maximum level is F. Volume changes can only be used for instruments which don't use Attack and Decay. The last volume adjustment will be stored global for that channel. If you want to reset volume settings, so that instruments will use their own ADSR, you have to set Volume parameter back to 00.
SWITCH Command won't reset the ADSR for following notes. It can be used in two ways. If we set one SWITCH command, then every following note will use the current ADSR setting until a further SWITCH or END - Command is arrived. Then the ADSR will be resetted. Take a look at the two examples:
|
|
GATE Command will activate the GATE of an played instrument. It should only set after a played note.
END Command have to be set in every sector and represents the mark of ending a sequence. It will define the total length of your sector too.
2.5.3 Time Control
So the main question is: How can i synchronize all three channels with different
played sectors. Therefor the total duration time is necessary. If your "tune speed" is
00 and if you setup your editor as follow, you should find following values on screen:
L: 0000 0008
|
The first 4 numbers represents the current played position. The Second 4 numbers represents the total duration time of a sector. It should be same in all other sectors (or a multiple or halve of that). In this example above you can calculate the sum for every note: DUR04+DUR02+DUR02 = 8. Notice that this number is always hexadecimal! After Editing the number it'll be refresh if you open again the sector or you start the playroutine.
Take care to choose a good divisible value. You'll understand it if you try drums. Notice that at the end of a sequence should stand an -END-, so that the player notice that you want change to the next sector in track. END, SND, DUR ... are commands, which are only readin from player and so they shouldn't stand in front of an END. These commands are not counted! Notes, GATE and --- are interpreted as full played notes, which are counted in a total duration of a sector.
In menu setup you'll find "tune setup". Here you can adjust the whole song speed. What does it means? A higher value will halve the speed. So that you can calculate the total duration time as follows: L:0000 XXXX = (tune SPD + 1)* all DURs (for Notes/Gate/---)
2.5.4 Global Filter and Pulse
There is an easy way to create cool Filter Effects and Low Frequency
Modulation for sequences, which are using filter.First, you have to create one instrument in Sound Editor. Choose the first instrument number. There you have to choose a filternumber (F) and activate the filter (FX: 20) for that instrument. Then go in Filter Editor, choose that number and define these parameters for testing that:
| F 3 09 00 00 | 01 00 00 00 00 FF |
| 25 01 01 01 01 25 |
Allright, now go back into the Sound Editor again. Copy your instrument-settings on a free place (another instr. number = 2) and paste your buffer. Now set FX: 22 - that means NO FILTER RESET. Go into Sector editor and put following sequence:
00 DUR.03
01 SND.01 ;FX: 20 you have to reset first the filter settings ;)
02 C-1
03 SND.02 ;FX: 22 NO FILTER RES to start global filter for next notes
04 C-2
05 C-2
06 C-1
07 C-2
08 C-2
09 C-1
0A C-2
0B END!
Ok, so you can create LFO envelops for all following notes. The filter envelope are transferable on other instrument, which using these filter settings too. Notice that all these setting are different for both SIDs (6581 /8580). You have to choose higher values on the 6581, otherwise the filtered instruments sound to deep. Pay attention to set filtered sounds only in one channel!
Ok, you can try these settings for Pulse instruments too. You only have to choose an instrument with Pulse Wave (41) with defined SPEED values and set FX to NO PULS RES instead NO FILTER RES.
2.6 Quick Recaps and Examples
Familiarize yourself with the sound tables. Now it is time to do some serious work on those
tables. For a start off reinit DMC and let us have just a normal instrument, which can be the
main instrument for any tunes, that you compose in future. Because you're
at sound #$00, enter as follows:
|
After setup wavetable press SHIFT + RETURN then press SPACEBAR to test the sound. There, we are, a perfect working sound. The octave of your test sound can be incremented and decrement by pressing SHIFT and '+' or SHIFT and '-' (depending on which way you would like your sounds' octave to go).
Okay, now press the UP ARROW key on your C64 to put the current sound intro memory buffer. Then press '@' to paste to the next instrument. Now all you need to do is add a filter. The next diagram enables a filter to be turned on.
|
Okay, so not much of a difference to this diagram. All I've done here was added '28' to 'FX'. Basically using '2' or 'A' underneath 'F' turns on the filter and the number under 'X' either emulates as a drum, or just holds your note down, until a GATE is set (GATES will be looked at later on in this feature).
Okay, now press the BACK ARROW (or CTRL in DMC7) yet again to enter the flashing bar menu, and then highlight the Filter Editor, using cursor keys, followed by RETURN to activate that editor.
The diagram below shows you what the filter editor looks like.
|
Now try the example above. There, now we have a filter ready for the sounds. Press SPACE to test your sound. There you are, what you think? Quite a nice sound eh? Press BACK ARROW (or CTRL in DMC7) to move back to the main menu.
Anyway, lets' go and create a new instrument, using the sound editor. Enter as follows:
ADSR L P SPEEDS L F V1 V2 ## FX
00AE 0 0 000000 0 0 00 00 02 08
Move your cursor to ## and then press SHIFT & RETURN. You're able to do this with any sound you decide to create, as well as change the ## values. The ## Values is where your put your sound type. Say for example we use ##66, this indicates the DMC player to jump along to section ##66 in the sound data tables.
Anyway, at ##02 we want to do a C64-style minor chord, so now copy as follows in the data tables:
02 21 00
03 21 03
04 21 07
05 21 0C
06 94 00 ;94 loop four sounds.
The last line controls the octaves. #$03 is octave 3, #$07 is octave 07, and #$0C is octave 12. #$94 repeats the four octaves for a while (depends on the attack/decay used).
Now do the same for the major chords (remember copy & paste to the next sound no).
ADSR L P SPEEDS L F V! V2 ## FX
00AE 0 0 000000 0 0 01 02 07 08
07 21 00
08 21 04
09 21 07
0A 21 0C
0B 94 00 - Not hard is it ;o) ?
Next we'll introduce some more instruments, for you to try:
Drums and Bass
This chapter takes a look at creating your own C64 drum kit. Let's get back to the sound editor and try as follows.
ADSR L P SPEEDS L F V! V2 ## FX
00E8 0 8 000000 0 0 01 02 0C 01
Now edit the table below:
0C 81 FF ;Drum 1
0D 81 FF
0E 41 0C
0F 41 0A
10 41 02
11 91 00 ;End
Now let's make cymbals:
ADSR L P SPEEDS L F V! V2 ## FX
00E9 0 0 000000 0 2 00 00 12 A1
12 81 FF
13 91 00
Enter the filter editor and enter in table 2. the following:
R T ## RT ST S1 S2 S3
0 4 A0 00 00 FF 00 00
Now let's create drum 2:
ADSR L P SPEEDS L F V! V2 ## FX
00A9 0 8 000000 0 0 01 02 14 01
14 81 7f
15 41 0E
16 41 0C
17 41 0A
18 41 08
19 81 55
1A 91 00
Now test all your drums.
Writing your First Tunes
Let us take a look at what we have done so far. Well, we played around with sounds and filters, now we shall start writing a little ditty. For a start off, hop on to the track editor, by cancelling the main menu (pressing BACk ARROW again). Now move into track editor. Pressing 'C= and E' sets STOP and 'SHIFT + E' puts end and loops to the very first sector.
Now go to track 1, highlight the sector at $00 and then press SHIFT & RETURN to enter the sector editor. Now do as follows in sector $00.
00 DUR.06
01 SND.XX ;Use the sound number which first drum is
02 A-1
03 SND.YY ;Use the sound no. which are cymbals
04 A-1
05 SND.ZZ ;Second Drum
06 A-1
07 SND.YY ;Cymbals again
08 A-2
09 END!
Quick recap: 'C= and S' sets SND.xx, which indicates the sound number which you want to use, while 0-9 and SHIFT A-F sets the sound no. 'C= and 'D' sets DUR.XX, which is the duration. Yet again, use the same number, and letter keys to set the sound. '£' sets a GATE (We'll look at this later), 'UP ARROW' copies the sector in to memory buffer, '@' pastes from memory buffer to current sector, 'SHIFT+X' sets SWITCH (Also will be looked at), while 'SHIFT+G' makes GLIDE. To place 'END', just press '='.
Let's edit SECTOR 1 to do a bit of music.
00 SND.00
01 DUR.06
02 A-1
03 A-1
04 A-2
05 A-1
06 A-1
07 A-2
08 A-1
09 A-2
0A END!
Now press F1 to listen to what you have done so far. There we are, your first tune done on DMC V4.0. Easy huh?
Introducing Volume Control
Not much will be happening this time, but we will be taking a look at some really cool things that can be done, when using the DMC V4.0 player. Well, i talked about installing a gate, I also talked about installing, what now? Ah yes, we’ll take a look at the volume feature. The volume feature can do amazing effects with your sounds. Especially when you are using the block/sequence editor. For example, you can do a sort of fading effect to your note. Why not try this:
SECTOR 00:
00 SND.XX
01 DUR.08
02 VOL.0E
03 A-4
04 VOL.0D
05 A-4
06 VOL.0C
07 A-4
08 VOL.0B
09 A-4
0A VOL.0A
0B A-4
0C VOL.09
0D A-4
0E VOL.08
0F A-4
10 VOL.07
11 A-4
12 VOL.06
13 A-4
14 VOL.05
15 A-4
16 VOL.04
17 A-4
18 VOL.03
19 A-4
1A VOL.02
1B A-4
1C VOL.01
1D A-4
1E END!
However the problem is, if you jump from one sector to another. Let us say for example this is your first sector, and you would like to edit your second sector, then you would need to set a volume, else the second sector will use the last volume which was used and we don’t really want that do we? Still; not to worry. We can sort this problem out by going to the next sector and set the correct volume or we set the volume back to 00. Okay then, let’s try this:
SECTOR 01:
00 SND.XX
01 DUR.08
02 VOL.0E
03 A-2
04 ------
05 ------
06 ------
07 ------
08 ------
09 ------
0A ------
0B ------
0C ------
0D ------
0E ------
0F ------
10 ------
11 ------
12 END!
Now combine these in track form. like this:
TRACK 1 TRACK 2 TRACK 3
00 - 00 00 STOP 00 STOP
01 - 01 01 - 00 01 - 00
02 STOP 02 - 00 02 - 00
Okay, now press F1 to play the small sample you created. If you find that there are no sounds coming through then the reason behind this is because you have not loaded or created any sounds. Else, you should hear the sample more easily.
Now then, here’s a challenge for you. Try and make the volume go UP instead of down. Heh, heh. I don’t know if you'll manage this, but why not give it a go.
Introducing Filter Control
Okay, now for something new. We are going to play around with filtered effects coming through with your sounds. When I was writing a piece of music for Commodore Scene's game ‘Stealth 4’, I originally used the DMC player to do the superb effects, but sadly I could not use the tune in the game, due to part of the player's routines being snipped off. So, I used the Dutch USA Team Music Assembler. But I still love the DMC player. Anyway, let's create a few filters and import them into some of our sounds shall we? Yeah, why not. We'll do at least six or seven filters for this bit. Before we do this initialize everything so that we have no sounds at all. Go to the sound editor and then enter as follows:
SOUND 00:
ADSR L P SPEEDS L F V1 V2 ##
00AA 0 0 000000 0 0 00 00 00
FX
20
Once you have done the sound data, go to ‘##’ and then press Shift + Return and edit the sound data tables.
00 21 00
01 91 00
When you have done your sounds, press Shift + Return to go back to the sound editor. Now we are going to the filter editor. Press the ‘Back Arrow’ key, and highlight ‘Filter Editor’ with your cursor keys. Once you have done this, select the first filter and do as follows:
Filter 0:
R T ## RT ST S1 S2 S3
F 1 08 00 08 00 00 00
Filter 1:
R T ## RT ST S1 S2 S3
F 1 18 00 18 00 00 00
Filter 2:
R T ## RT ST S1 S2 S3
F 1 28 00 28 00 00 00
Filter 3:
R T ## RT ST S1 S2 S3
F 1 38 00 38 00 00 00
Filter 4:
R T ## RT ST S1 S2 S3
F 1 48 00 48 00 00 00
Filter 5:
R T ## RT ST S1 S2 S3
F 1 58 00 58 00 00 00
Filter 6:
R T ## RT ST S1 S2 S3
F 1 68 00 68 00 00 00
Now, go back to the sound editor and copy each sound by pressing ‘Up Arrow’ and paste to the next sound and change the value of ‘F’. This is because ‘F’ represents the filter number your C64 tries to read.
Now let's go back to the track editor and play around with the filtered sounds. First of all, in your track editor, do as follows:
TRACK 1 TRACK 2 TRACK 3
00 - 00 00 STOP 00 STOP
01 STOP 01 - 00 01 - 00
Now enter the sector editor and do as follows:
SECTOR 00:
00 DUR.03
01 SND.00
02 C-1
03 C-2
04 C-2
05 C-1
06 C-2
07 C-2
08 C-1
09 C-2
0A SND.01
0B C-1
0C C-2
0D C-2
0E C-1
0F C-2
10 C-2
11 C-1
12 C-2
And keep repeating until you have done SND.06, then go back down again to SND.01. Well basically that is all I’ll be leaving with you with in this chapter. Just play around with DMC.
2.7 Packer
DMC 4 and DMC 7 have an integrated packer (inside). If you store your tune, the
tune will be relocated to $1000 and packed. There is no need for any external
packer.
2.8 Relocator
Often if you do a demo or a game, it's necessary to relocate your tune(s) to
another position in memory. DMC 4 and 7 sets the init routine automaticaly
to $1000. The play routine will start at $1003 for normal or at $1006 for
multiple player settings.Check out several relocator tools, which are free in internet to relocate DMC 4 tunes. Watch out for the right version too. DMC 7 hasn't any Relocator tool, but Hoeppie (a member of forum64) is still working on it (in 2007 ;)). So watch out for next releases.
3 Getting Started with DMC 5
Introduction /
The Sound Editor /
Making Your Drumkit /
Making your first piece of music /
The Other Bits /
Packing your music
3.1 Introduction
This tutorial goes through how to use DMC 5. Compared to DMC 4, DMC 5
is a complete other music editor and is a whole lot more difficult. Compared to
DMC 4, the composer looks really basic, but to tell you the truth, it's not that
BASIC. It has a whole lot more put into it.
|
As with DMC 4, there are no instruments ready made, so we are going to have to program these ourselves, but before we do. We'll take a look at the DMC 5 itself. Take a look at the screen below and you'll see what I'm talking about. If you understanding the whole manual of DMC 4, you will get easy into DMC 5. Remember, both editors have their own advantages and disadvantages.
As you can see, this is the main environment of the DMC composer. And it does look pretty dull doesn't it? Well don't worry, it's a good composer anyway ;o) You are able to download an updated version of DMC 5, from the Friends Downloads page. It is Public Domain and is allowed to be spread. Some instructions are also included on how to get yourself started with this editor (mainly the controls).
3.2 The Sound Editor
Before you try and get composing music. What we'll need to do first is use the
Sound Editor. It wont be such an easy stage, as you would be required to
have some sort of programming knowledge to work these sounds 100%. Below
you'll see a screen shot and the names for the parts of the sound editor.
The size of this image is pretty meaty, but parts of the editor have been
marked with white numbers, so I could indicate to you what these functions are.
|
1. Attack/Decay:
This controls the default volume and duration of your instrument.
2. Sustain/Release
A second control, which is to set a volume and longer, continuous duration of your sound.
3. Waveform
This function reads from the wave form table, to form instruments.
4. Pulse
A special function, which creates pulse sounds according to table, for when you use $4x or $5x as a sound inside the Wave form editor.
5. Filter
A special function which allows you to add a synthesized filter into your sounds. Please note that these will not work unless you set FLT.XX with/without FRQ.XX in the sector editor.
6. Vibrato #1
Controls the vibrato delay.
7. Vibrato #2
Same again, but this time with another vibrato.
8. Vibrato #3
A special vibrato to create various modes.
9. Sound Number
This indicates the instrument you are currently creating.
10. Waveform Table
A table where you program your own sounds.
11. Pulse Table
A table where you program your own pulse.
12. Filter Table
Where you program your filters.
13. Sound names (Not numbered)
If or however, you wanted to store your own instruments data then you can load and save all your sounds from the disk.
Now that's all the functions, we are now going to create a few instruments.
Before we actually create any instruments, you should read the section about Waveforms in Wavetable in DMC 4 manual above. Same types will be used in front of the DMC 5 wavetable too.
Right, now we have got these set up, we shall now make some instruments, because although there are some sampled sounds supplied with DMC V5.0+, it would be very lame to use another person's instruments. We will make our first sound, which is the main lead. So copy the following from the diagram below.
|
You may think 'Aaaah you're doing the same thing', but that is where you are wrong, because the waveform is pointing at the correct position of the wave table. The pulse is not required to be used, as the C64 recognizes it as a saw tooth. And we still use $01 as the filter. What's happening here is that we're calling the right wave forms.
Please remember that there's more that meets the eye, when producing sounds and music using the DMC V5.0 player. Later on we will be showing you how to do filtered voices, but first, we'll work on the main sounds. We'll try and create a minor chord, using saw tooth. Where we were last left from, go to the next free sound (Where it's all blank) and then enter the following example below:
AD SR WV PU FL V1 V2 V3
0C 00 04 00 00 00 00 00
Now move your cursor underneath WV (Which represents the wave table) and then enter the wave table, by pressing the SHIFT button and RETURN. Now edit the wave table as below:
04 2100
05 2100
06 2103
07 2103
08 2107
09 2107
0A 9004
You probably wonder why I used 00,03,07 beside the wave form number, 21. This is because 21 represents the saw tooth and $00,$03,$07 represent the octave to make a minor chord. Using 9004 will make the sound jump back at $04 so we have a continuous minor chord. Which you should be familiar with in the future.
Our next step will be to create a major chord. So go to the next blank sound table make everything the same, except the WV, and put 0B (not zero eight) on to the wave table. We are now going to make a major chord. Follow this example below:
0B 2100
0C 2100
0D 2104
0E 2104
0F 2107
10 2107
11 900B
There we are, simple enough. We have created a major chord, using $00,$04,$07 as the octaves. Try experimenting more with the octaves beside the wave forms, you'll end up with some cool effects. I promise :)
3.3 Creating Your Own Drum Kit
After getting used to various sounds, we are going to start to go a little
further into the music making scene. Before we actually compose any
sort of music, using DMC 5 player, you cannot be without certain
sounds. The next sounds which we are going to create is our own drum
kit. As usual, in the sound editor, let's find the next blank sound,
indicate attack decay (AD) as $08 and sustain release (RS) as $00,
indicate the wave form table to jump to $12 and pulse table (PU) to jump
to $05 and then follow the example below.The Wave Table:
12 89FF
13 490B
14 4909
15 0900
16 9015
This was for our first drum. As you notice, we mix our sounds, to make it C64 drum like. At first you will find this task difficult, but it will get even more simpler once you have got used to this. Now lets create our own pulse table.
05 0800
06 0000
07 0000
08 9006
Here we are, our first drum. We have another drum to create, which should be simple enough. Find the next blank sound and then set the wave form to jump to $17 on the wave table, copy the pulse table as above, set the attack/decay as $09. Now follow this example for our wave table.
17 89FF
18 490F
19 81FD
1A 490D
1B 490B
1C 89FF
1D 901C
That's our second drum complete. We are nearly ready to get started using the track and sequence editors for composing music, but before you get started, try and experiment more creating sounds, etc. If you want to create your own filter tables, then use the same method with the pulse tables, and set up your own filters for your sounds. These filters wont work unless you set the filter in DMC 5's sequence editor, but we will be taking a look at this later on.
3.4 Making our first piece of music
If you remember taking a look at the DMC 4 tutorial, you would have
familiarized yourself with the track editor. DMC 5's track editor is
-exactly- the same. No instructions really needed to on how to use the
track editor, except for use SHIFT+RETURN to enter the sector
editor. You probably have the instructions with DMC 5 on how to access these editors.
Now let's do a small piece of music, to get you started. Go to sector $00 and
enter the following:SECTOR 00:
00 DUR.03
02 SND.01
04 D-3
05 D-4
06 D-4
07 D-3
08 D-4
09 D-4
0A D-3
0B D-4
0C END
Now let's edit sector $01: this is where we have the drums and bass. xx will represent drum 1 and yy will represent drum SECTOR 01:
00 DUR.03
02 SND.xx
04 D-2
05 SND.00
07 D-2
08 D-3
09 D-2
0A SND.yy
0C D-2
0D SND.00
0F D-2
10 D-3
11 D-2
12 END
Now we have two sample, we'll leave the third track blank, so you can experiment with the sequence editor. This tutorial is only for DMC V5.0 beginners and will be updated later on, probably in a couple of month's time.
Now let's play with the track editor and make the two sequences sound like music.
TRACK1 TRACK 2 TRACK 3
00 TR+00 00 TR+00 00 -STOP-
02 --- 01 02 --- 00
03 --- 01 03 --- 00
04 --- 01 04 --- 00
05 --- 01 05 --- 00
06 TR+03 06 TR+03
08 --- 01 07 --- 00
09 --- 01 09 --- 00
0A --- 01 0A --- 00
0B --- 01 0B --- 00
0C TR-02 0C TR+02
0E --- 01 0E --- 00
0F --- 01 0F --- 00
10 --- 01 10 --- 00
11 --- 01 11 --- 00
12 TR+05 12 TR+05
14 --- 01 14 --- 00
15 --- 01 15 --- 00
16 --- 01 16 --- 00
17 --- 01 17 --- 00
18 END! 18 END!
19 --- 00 19 --- 00
There you go, a 2 channel piece of music. I was going to add more, but there really is no point, because this is a tutorial to get you all started using DMC. Anyway, here's some more interesting things before I leave you experimenting using DMC 5.
3.5 Other Bitz!
You have understood the basic bits using DMC 5. Now we shall go into the
harder parts on using the DMC music editor 5. I'll show you how to
use a music packer later on, but first of all let's familiarize
ourselves with the sector editor a little more. You may notice that we
only used simple commands, but you can also use other commands, such as
VOL.xx, which is volume (Shift+V), SWITCH (Shift+X) ADSR.xx
(Shift+Y), FILT.xy (Shift+F), FREQ.xx (Shift+Q) and -GATE- (£),
GLD.xx (SHIFT+G), SLD.xx (SHIFT+S).When you add a filter to your sounds, you must use track 3 for the particular sound to work a lot more properly. What you do is add the sound no, read from the sound table, then you at FLT.xy. You may wonder why I added xy. This is because 'x' represents the filter type (use 1,3,4 or 5) and 'y' represents the volume of the filtered sound. After using filter command, you can add a note. Also when using filtered sounds, you can add a frequency filter (FREQ.xx). You can use any value for the frequency sounds. ADSR can also do cool effects in your sounds.
To stop a note from playing, we use the -GATE- command. You can use -SWITCH- to add some effect to your sequence. You can also use the glide and slide commands (GLD+SLD) to make your note slide.
When you are composing music, you have to be extremely careful, because if the duration of your sounds do not calculate up to the same value, your song will go out of tune.
3.6 Packing your Music
There are two different sorts of packers for DMC 5. There is the original
packer by Graffity, or the DMC 5 packer by Iceball/Motiv8. These two
packers will raw DMC music files and then will pack these to a smaller
size (just like an ordinary cruncher and packer). Don't attempt to use
a cruncher or different packer for these tunes, else you'll just get a
load of garbage in your machine code memory. If you use Action Replay,
then I recommend that you use the GRAFFITY version of the packer, else
if not. Then you can use Iceball's DMC 5 packer instead.To use GRAFFITY packer, using Fastload or BASIC, load the packer like you normally load a normal C64 disk program. Next load your own music file like you do in BASIC, then enter M/C monitor and type G $2E00. Once done, wait a few secs then enter the address where you want to load your packed music. I recommend you use $1000 as start address so you can use the tune on various PD utilities, such as Old school Demo Makers, Note Writers, etc. Once done, your tune will relocate and pack to the address. Now save the tune, and play it (init $1000, play $1003) in your own programs or PD utilities ;).
To use Iceball's DMC 5 packer, load from BASIC, enter load name and then enter the address to pack to ($1000), wait and then save. Easy. That ends our DMC 5 music composing tutorial ;o). Maybe there will be more in the future.