
SCREEN PROGRAMMING / DISPLAYING HELLO WORLD / DISPLAYING A MATRIX TO SCREEN RAM / DISPLAYING SINGLE CHARACTER SCREENS FROM CHARPAD AND COLOUR DATA
/ MOVING TEXT (SCROLLING HORIZONTALLY) / MOVING TEXT (SCROLLING VERTICALLY)
/ DISPLAYING BITMAP GRAPHICS
/ Making Star Fields / Scrolling Single Characters / Character Animation
Displaying text/characters & their colours on screens
This section
is all about displaying text/characters on to the screen. Well,
before we move on to the next part of putting text/characters from
screen data memory on to the screen RAM, we shall do a simple little
HELLO WORLD program in C64Studio. Alright, so this is nothing special, but it will
introduce you to a command, often used in turbo assembler called .TEXT.
This is useful for those of you who want to write text, without
designing a screen using any specific hardware or software, i.e. Action
Replay cartridge, Screen Editor, etc. We are using default BANK #3, to
display our screen characters. So the character store range will be
from $0400-$07E7. Where $0400 will be the very first char on screen,
and $07E7 will be the last char on screen.
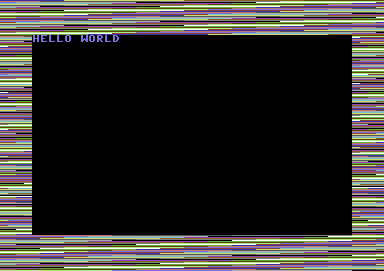
An example of the HELLO WORLD program.
;======================================
;
HELLO WORLD - ASSEMBLY VERSION
;======================================
!TO "HELLOWORLD1A.PRG",CBM
SEI
JSR $E544 ;QUICK SCREEN CLEAR
LDA #$02 ;RED BORDER
LDX #$00 ;BLACK BACKGROUND
LDY #$14 ;DEFAULT C64 CHAR
STA $D020
STX $D021
STY $D018
;DISPLAY HELLO WORLD! AT $0400
LDX #$00
DISPHELLO LDA HELLOTXT,X
STA $0400,X
INX
CPX #$0B
BNE DISPHELLO
SPACEKEY LDA $DC01 ;WAIT FOR SPACEBAR
CMP #$EF
BNE SPACEKEY
JMP $FCE2;(SOFT RESET C64)
HELLOTXT !TEXT "HELLO WORLD!"
RESULT:

Well that is not a good result, as the displayer uses the second set of characters (SHIFT+whatever key used), so what we will want to do is convert the chars by checking what they are. This can easily be done by adding some extra code into the loop which calls the text display. Change the code under ;DISPLAY HELLO WORLD to:
;DISPLAY HELLO WORLD! AT $0400
LDX #$00
DISPHELLO LDA HELLOTXT,X
CMP #$40 ;IS TEXT CHAR OVER #$40.
BCC CHAROKAY ;ELSE DON'T CHANGE
SEC ;OTHERWISE CONVERT
SBC #$40 ;TO CORRECT CHARS.
CHAROKAY STA $0400,X
INX
CPX #$0B
BNE DISPHELLO
There is a way to bypass this problem without needing to change this code, if you are using C64 Studio as it uses a special screen command which is !CT SCR before !TEXT. So if you are using C64Studio, just place !CT SCR one line before placing !TEXT for your message. Otherwise, use this method if your are using a Turbo Assembler compatible cross assembler or TURBO ASSEMBLER itself. Another method would be to automatically use Action Replay cartridge machine code monitor to update the text. Test the result. Okay, now where SPACEKEY is, insert a INC $D020 but keep the LDA $DC01 prompt.
Now that's a bit of fun for you eh?. ;)
BACK TO TOP
Screen Data to Screen RAM
How can we display text or characters on the screen? Easy, we use loops, but we need to use screen RAM, which is located in different memory banks. We shall stick to the normal C64 display bank ($0400 - $07E7), so that then we can display some text.
For a start off, let us try and something, which is located at $4000 and then pastes it through the whole of the screen area. Remember, this is only an experiment. There are different methods, but we'll use a simple method on displaying a screen, that is located at $4000.
;================================
;DISPLAYING
TEXT AT BANK
#$03
;================================
;SET UP PERAMETERS
SCREENLOC1 =
$4000
SCREENLOC2
= $4100
SCREENLOC3
= $4200
SCREENLOC4
= $42E8
SCREENPOS1 =
$0400
SCREENPOS2
= $0500
SCREENPOS3
= $0600
SCREENPOS4
= $06E8
!TO "TEXTDISPLAY.PRG",CBM
* = $0900 ;SYS2304
SEI
LDX
#$00
;X=0
DISPLAY
LDA
SCREENLOC1,X
;READ
FROM SCREENLOC1 'X' TIMES
STA
SCREENPOS1,X
;PASTE TO SCREENPOS1 'X' TIMES
LDA SCREENLOC2,X ;READ
FROM SCREENLOC2 'X' TIMES
STA
SCREENPOS2,X
;PASTE TO SCREENPOS2 'X' TIMES
LDA SCREENLOC3,X ;READ
FROM SCREENLOC3 'X' TIMES
STA
SCREENPOS3,X
;PASTE TO SCREENPOS3 'X' TIMES
LDA SCREENLOC4,X ;READ
FROM SCREENLOC4 'X' TIMES
STA
SCREENPOS4,X
;PASTE TO SCREENPOS4 'X' TIMES
INX
; X=X+1 UNTIL X = $FF (256)
BNE
DISPLAY
;IF X <> $FF THEN GOTO DISPLAY
RTS
;END PROGRAM
Compared to using BASIC, this routine is smaller and more compact to display text.
Now that you know how to display the screens, we want to display colours for the text. And here is how we can do this:
The colour RAM is always between $D800 and $DBE7. Therefore, variables can be created for the colours. So create some new variables, which are as follows:
COLOURPOS1
=
$D800
COLOURPOS2
= $D900
COLOURPOS3
= $DA00
COLOURPOS4
= $DAE8
Then inside
your
loop
(underneath STA SCREENPOS4,X) enter the following:
LDA #$0A
STA COLOURPOS1,X
STA COLOURPOS2,X
STA COLOURPOS3,X
STA COLOURPOS4,X
You don't just get the screen displaying only text, but you get the text to display painted in pink ;o)
Why not play around with the colours. Here is a small table on which colour does what job :o)
|
|
|
|
|
|
|
|
|
|
|
|
|
|
|
|
|
|
|
|
|
|
|
|
| $07 |
Yellow |
|
|
|
|
|
|
|
|
|
|
|
|
|
|
|
|
|
|
|
|
|
|
|
|
DISPLAYING EXPORTED CHARPAD FILES (CHARSET, 1x1 SCREEN (MAP) AND ATTRIBUTES)
If you are using a cross assembler, such as ACME, C64STUDIO or any other particular program. You are using charpad, and would like to display your own single screens using the CHARPAD? Well, simply create your very own project. Draw your own graphics screen. For this example, I have picked up the graphics from one of my cancelled game projects, Sen2itive (Sensitive 2), as it didn't quite work out for me. I never even done any levels for the game, after starting the code in 2016. Here is what you need to do:
Draw a single screen (40 chars width, 25 chars height) using Charpad V2.0. Colours must be based on character colour. You may use tiles if you want to, as a start, compress chars, etc. Then disable the tile mode, so 1x1 chars are used instead. Save the project. Then export as separate files. They are:
- CHARSET (Basically the charset for your game / demo screen)
- ATTRIBUTES (Colour data of the charset for your game / demo / intro screen)
- MAP (The actual MAP of the game/demo/intro screen)
Let's select some positions to place each raw binary (after extracted) (Unless you have used a version of charpad that exports single char screens to .PRG format that is). Now what you want to do is DISPLAY the background image, multicolour, etc.
This example is based on TURBO ASSEMBLER, in 64ASM
;Display custom char screen to BANK 3 screen RAM
;by Richard/TND
!TO "DISPLAYCHARPADBINARIES.PRG,CBM
*=$0810 ;SYS2064 to run
SEI
LDA #$37
STA $01
LDA #$18
STA $D016 ;Screen Multicolour mode enabled
STA $D018 ;Charset mode set to display custom char $2000-$2800
LDA #$00 ;Set colour black
STA $D020 ;to border
STA $D021 ;and background
LDA #$0B
STA $D022 ;Char Multicolour 1
LDA #$0C
STA $D023 ;Char Multicolour 2
;Draw main screen from matrix -
;NOTE max 256 chars per location ($0400-$04FF, $0500-$05ff,
;$0600,$06ff,$0700,$07e8)
LDX #$00
DRAWSCRN
LDA MATRIX,X ;Get data from screen data file SCREEN.BIN
STA $0400,X ;Put data into SCREEN RAM
LDA MATRIX+$100,X ;Fetch the next 256 bytes of data from binary
STA $0500,X ;Store the next 256 bytes to screen
LDA MATRIX+$200,X ;... and so on
STA $0600,X
LDA MATRIX+$2E8,X
STA $06E8,X
INX ;Increment accumulator until 256 bytes read
BNE DRAWSCRN ;
;Draw attributes from 256 bytes attribs table and place these to SCREEN RAM
LDX #$00
PAINTCOLS
LDY $0400,X ;Read screen position
LDA ATTRIBS,Y ;Read attributes table
STA $D800,X ;Store to COLOUR RAM
LDY $0500,X ;Read next 256 screen positions
LDA ATTRIBS,Y ;Store to COLOUR RAM + $100
STA $D900,X ;... and so on
LDY $0600,X
LDA ATTRIBS,Y
STA $DA00,X
LDY $06E8,X
LDA ATTRIBS,Y
STA $DAE8,X
INX ;Increment accumulator until 256 bytes read
BNE PAINTCOLS
JMP * ;Infinite loop
;If using a cross assembler use CORRECT pseudo command, offset for importing binary data
*=$2000
!BINARY "CHARSET.BIN"
*=$2800
MATRIX
!BINARY "SCREEN.BIN"
*=$2C00
ATTRIBS
!BINARY "ATTRIBS.BIN"
RESULT:
BACK TO TOP
Moving text horizontally
As well as display text, graphics or whatever you like. It is also possible to move text horizontally or vertically. You many have noticed intros / demos in the past that allowed to scroll a message across the screen. Most scroll text tends to be smooth scrolling. Smooth scrolling is controlled by a raster split, which is featured in the next chapter. For now, I am going to give you a small example on scrolling a message, without IRQs and Raster interrupts. This is not an actual program, just a simple subroutine. If you want to. Create a simple program like
;Horizontal scrolling message subroutine
!TO "HSCROLL.PRG",CBM
*=$0810
LOOP
LDA #$80
CMP $D012
BNE *-3
JSR HSCROLL
JMP LOOP
HSCROLL
LDA XPOS
SEC
SBC #$02 ;Set speed of scroll (Can be altered)
AND #$07 ;Control max HPOS as $07.
STA XPOS
BCS ENDSCR
LDX #$00
MOVESCR
LDA $07C1,X ;Pick row 25, and copy 39 characters from column 1
STA $07C0,X ;Place all characters one column back
LDA #7 ;Just for fun, make yellow text.
STA $DBC0,X
INX
CPX #$28 ;Repeat 40 characters, until full scroll of the screen
BNE MOVESCR
SCRREAD
LDA MESSAGE ;Self-mod address for message position
CMP #$00 ;CHECK FOR @ COMMAND
BNE STORE
LDA #<MESSAGE ;RESET MESSAGE
STA SCRREAD+1 ;SELFMOD STORE LOW BYTE OF MESSAGE
LDA #>MESSAGE
STA SCRREAD+2 ;SELFMOD STORE HI BYTE OF MESSAGE
JMP SCRREAD
STORE
STA $07E7 ;Last char of the screen
INC SCRREAD+1 ;Increment lowbyte position of the message
BNE ENDSCR
INC SCRREAD+2 ;Increment hibyte position of the message
ENDSCR
RTS
XPOS !BYTE 0
!CT SCR
;MAIN TEXT MESSAGE
MESSAGE
!TEXT "this is a horizontal scrolling message ... "
!TEXT "it can either be long or short ... "
!BYTE 0 ;SETS @
So then, how does it work? Well, a loop is called to pull a set of 39 characters from one column forward inside a loop. Then it pulls the 39 characters back one column. A self-modifying setup SCRREAD + 1 or 2, is used for displaying a single character from the message to the very last character on the screen. SCRREAD reads the low (SCRREAD+1) +hi byte (SCRREAD+2) of the scrolling message. The current low/byte address selected in SCRREAD will place one last character at the end of the screen. To move on to the next character from the message we want the computer to display. SCRREAD's low or hi byte self-modifying address changes. The subroutine will simply increment the low byte of a message, until value $00 is found. Then it increments the hi-byte. Every self-mod increment works the same kind of way. Every time you run a program with a scroll text. It is very important to initialise the text of the scroll. Simply by calling out:
LDA #<MESSAGE
STA SCRREAD+1
LDA #>MESSAGE
STA SCRREAD+2
I showed you how to display a 1x1 character. Later on in Assemble It, there are examples on how to display a 1x2 character to screen. This is simply called by fetching a screen row above, and changing the character mode using an EOR or CLC ADC value code. This really depends on where the next character set value lies to form your own character set. There's more on this later.
BACK TO TOP
Moving text vertically
Moving text vertically is also possible, but it can eat quite a lot of raster time. The best way is usually to generate a few loops. The basic idea of moving a text is simply to pull each row from the top to the bottom (or vice-versa) inside a loop. Then update a message or similar. A small example (Using 8 rows and 40 columns):
;
;Upward Scroller by Richard/TND
!TO "UPCROLL.PRG",CBM
*=$0810
LOOP
LDA #$80
CMP $D012
BNE *-3
JSR UPSCROLL
JMP LOOP
UPSCROLL
LDA YDELAY ;Set out a delay for the upscroll
CMP #$08 ;Delayed enough? because upscroll is FASTER
BEQ YDELAYOK ;compared to side scroll.
INC YDELAY ;Increment delay by 1 byte until 8
RTS
YDELAYOK
LDA #$00 ;Reset delay
STA YDELAY
LDA YPOS ;Set Y-Position for upwards scroll
CMP #$10
BPL DOSCROLL ;If scroll value is UNDER $10 ... Call DOSCROLL
SEC ;else, subtract value by 1
SBC #$01
STA YPOS ;for smooth scroll.
RTS
DOSCROLL
LDA #$17 ;Reset value of Y POS for scroll
STA YPOS
;Move screen data upwards, one row after another
LDX #$00
PUTTXT
LDA $0400+1*40,X ;Take 40 chars from last row
STA $0400,X ;Position to row above ...
LDA $0400+2*40,X ;Repeat with the next row
STA $0400+1*40,X ;place to previous row ...
LDA $0400+3*40,X ;and so on ...
STA $0400+2*40,X
LDA $0400+4*40,X
STA $0400+3*40,X
LDA $0400+5*40,X
STA $0400+4*40,X
LDA $0400+6*40,X
STA $0400+5*40,X
LDA $0400+7*40,X
STA $0400+6*40,X
INX
CPX #$28
BNE PUTTXT
LDX #$00
SCRREAD
LDA MESSAGE,X ;Self modifying message ...
STA $0400+7*40,x
CMP #$00 ;@ SPOTTED?
BNE SKIPRESET
LDA #<MESSAGE ;Reset message now @ is spotted.
STA SCRREAD+1
LDA #>MESSAGE
STA SCRREAD+2
JMP SCRREAD
SKIPRESET ;Standard message found, skip reset!
INX
CPX #$28 ;Read 40 chars per row
BNE SCRREAD
LDA SCRREAD+1 ;Move on to the next row of upscroll
CLC ;text data. Stored in MESSAGE
ADC #$28
STA SCRREAD+1
LDA SCRREAD+2
ADC #$00
STA SCRREAD+2
RTS
YDELAY !BYTE 0
YPOS !BYTE $17 ;Always init with $17 for scroller
!CT SCR ;Convert text to PETSCII screen codes ...
MESSAGE !TEXT "----------------------------------------"
!TEXT "this is an upwards scrolling text, which"
!TEXT "can be as long or short as you want it "
!TEXT "to be. "
!TEXT " "
!TEXT "please also note that upwards scrolling "
!TEXT "text can actually take up more space, "
!TEXT "in memory, compared to a horizontal "
!TEXT "scrolling message. still, it works! "
!BYTE 0
It is also possible to reverse scroll a vertical scroller. An example of this is featured in the game section of this tutorial (Chapter 6).
BACK TO TOP
Displaying Multicolour Bitmap Graphics
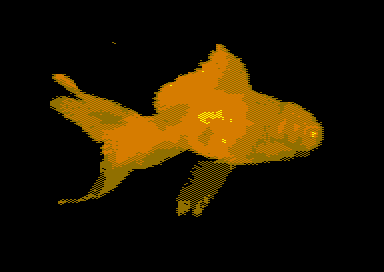
Displaying multicolour bitmap graphics (i.e. pictures, etc) can be quite a challenge for newcomers. However it isn't all that hard. All you need to do is know the charset and bitmap and screen area for where a bitmap lies. It is also possible to split picture data and place it into another memory. You can either load in a default picture image, and split it into 3 files (Colour RAM Data, Video RAM (Screen) Data and Bitmap). Then install the 3 sets of picture data in to C64Studio as PRG format (Add !bin "filename.prg",,2). The question is HOW DO I KNOW WHERE TO PUT THE BITMAP?
Well, the answer is that you can place the BITMAP into one of the 4 different banks. However the SAME address of the memory bank must be used. You would also need to change the CHAR RAM, to be able to read the screen memory position. Here is HOW to display a bitmap picture. (This is a default Koala Paint default source below).
;Koala paint displayer (Default position)
SCRDAT = $7F40
COLDAT = $8328
BACKGROUNDCOLOUR = $00 ;Black selected.
!TO "KOALAPAINTPIC.PRG",CBM
*=$0810 ;SYS2064
SEI
;Draw full colour + screen RAM to
;screen.
LDX #$00
DRAWDATA
LDA COLDAT,X ;Read colour RAM data at $7f40 (After the bitmap)
STA $D800,X ;Store to C64's Colour RAM
LDA COLDAT+$100,X ;Read the next 256 bytes of colour RAM data, at $8040
STA $D900,X ;Store to C64's colour RAN + 256 bytes
LDA COLDAT+$200,X ;... and so on!
STA $DA00,X
LDA COLDAT+$2E8,X
STA $DAE8,X
LDA SCRDAT,X ;Read screen/video DATA at $8328
STA $4000,X ;Store to C64's video RAM set at BANK #$02
LDA SCRDAT+$100,X ;Read the next 256 bytes of colour RAM data, at $8428
STA $4100,X ;Store to C64's video RAM + 256 bytes at BANK #$02
LDA SCRDAT+$200,X
STA $4200,X
LDA SCRDAT+$2E8,X
STA $42E8,X
INX ;READ 256 Bytes before finished drawing chars
BNE DRAWDATA
;Set screen BANK to BANK 2, Set char display to #$18
;and allow multicolour mode to be set on to the screen
lda #$02 ;Screen BANK #$02
sta $dd00
lda #$18 ;Charset mode/Bitmap mode to use $4000 in BANK #$02
sta $d018
lda #$18 ;Screen multicolour on
sta $d016
lda #$3b ;Bitmap mode ON
sta $d011
lda #BackgroundColour
sta $d020
sta $d021
jmp * ;Jump to itself
;Import the standard KOALAPaint picture into the C64's memory.
*=$6000 ;Default address for koalapaint picture
!bin "goldfish.koa.prg",,2 ;Always use the ,,2 prompt for PRG files
Splitting a picture manually:
To split a picture manually, you can use two different methods. The best method is by using a PC tool that can load Koala paint pictures (or bitmap pictures of any other format), and split out the data. GANGED is a good example for doing exactly that. It can also convert PC bitmap images into C64 graphics formats. PixCen can probably do the same job, but is more for artistic talent
To split a picture manually on a native C64. You can do it in different ways. The easiest way would be to use Picture Splitter by Brix. Or alternatively, if you know what type of format your picture has been saved as. Use a manual save. The manual save here is for KoalaPaint pictures, being split and saved to a new load address, using Action Replay/Retro Replay machine code monitor. It might be possible to do the same with other monitors:
Saving a bitmap data from $6000-$7f40 and setting load address to $2000
S "BITMAP.PRG",8,6000,7F40,2000
Saving a video RAM from $7F40-$8328 and setting load address to $4000
S "VIDRAM.PRG",8,7F40,8328,4000
Saving a colour RAM from $8328-$8710 and setting load address to $4400
S "COLRAM.PRG,8,8328,8710,4400
What if you want to display your picture at these addresses?. Well, of course you would need to link all 3 files to one program (Simply by loading each binary/prg separately). Here isa C64Studio example which will do EXACTLY that.
;Displaying a moved picture data to default
;C64 BANK memory
COLDATA = $4400
VIDDATA = $4000
BACKGROUNDCOLOUR = $00
!TO "MOVEPICTURE.PRG",CBM
SEI
;Draw the bitmap colour + screen data to
;standard screen area at BANK #$03 (Default BANK)
LDX #$00
DRAWSCREEN
LDA VIDDATA,X
STA $0400,X
LDA VIDDATA+$100,X
STA $0500,X
LDA VIDDATA+$200,X
STA $0600,X
LDA VIDDATA+$2E8,X
STA $06E8,X
LDA COLDATA,X
STA $D800,X
LDA COLDATA+$100,X
STA $D900,X
LDA COLDATA+$200,X
STA $DA00,X
LDA COLDATA+$2E8,X
STA $DAE8,X
INX
BNE DRAWSCREEN
LDA #$03
STA $DD00 ;Screen BANK #$03
LDA #$3B ;Bitmap mode
STA $D011
LDA #$18
STA $D018 ;Charset /screen mode for displaying screen $0400-$07E8
LDA #$18
STA $D016 ;Multicolour mode
jmp *
;Import binary files (Bitmap, Video RAM and Colour RAM) to memory
*=$2000
BITMAP
!BINARY "FISHBITMAP.PRG",,2
*=$4000
VIDRAM
!BINARY "FISHVIDEODATA.PRG",,2
*=$4400
COLRAM
!BINARY "FISHCOLOURDATA.PRG",,2
That's all for screen programming part in this tutorial. The next part is going to be slightly more fun. Where we take a look at raster splits, interrupts, and create some amazingly fun oldschool effects using rasters and interrupts. Also we will attempt to make an oldschool PETSCII intro and a few other things slammed together from previous tutorials.